How to Make Continuous Maps Minecraft
Create an interactive map of your Minecraft world
2021-03-17 | Other
You have a Minecraft world. You want to know what it looks like. Something like Google Maps of your world would be nice. GOOD - this is what you are going to learn today.
In this tutorial I will cover the following use cases:
- You have Minecraft world files of an existing world. You want to get a map only of its explored parts.
- You have Minecraft world files, you want to auto-explore it and get a map of that.
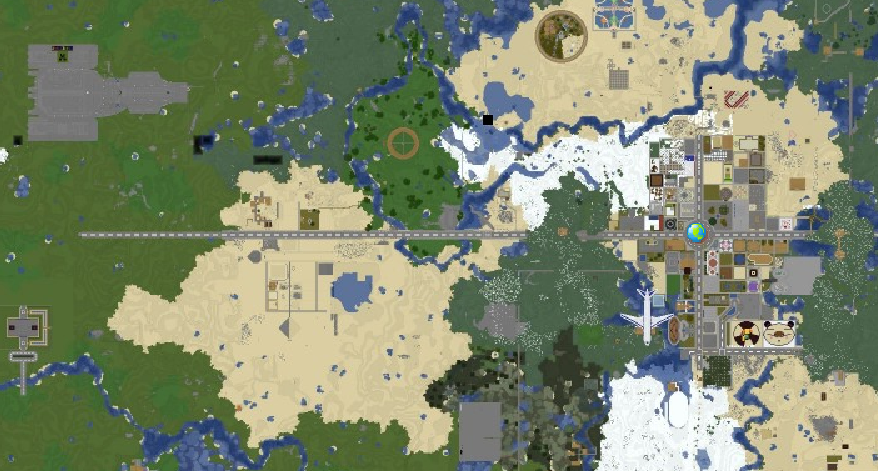
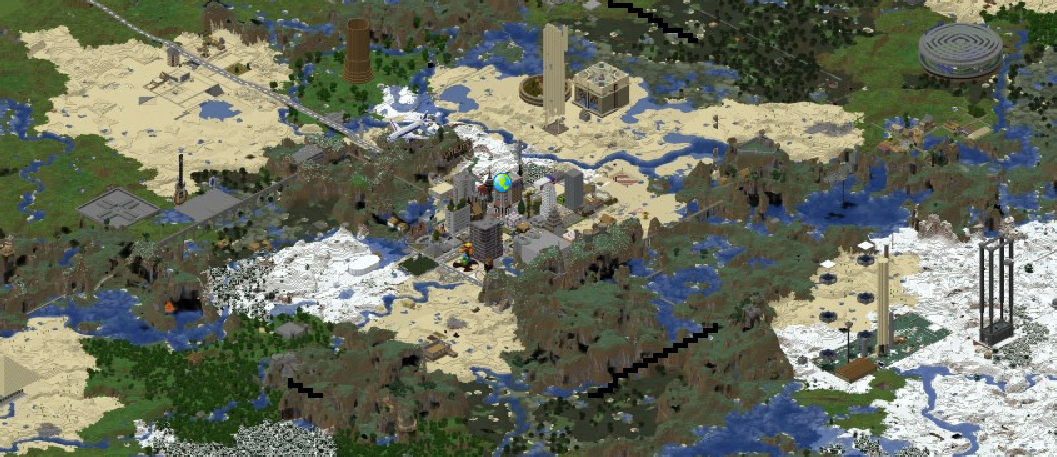
It does not matter whether the world comes from single or multiplayer. In both use cases, you will end up with an interactive map accessible through your browser. The map will look something like this:


You will be able to zoom in and zoom out on both of these and switch between them. As a side effect, an isometric "cave" map will also be generated.
To achieve that, you will leverage the following tools:
- Spigot server software
- Dynmap plugin
- (Use case #2 - only) WorldBorder plugin
Setup is the same for both use cases, except in use case #2, you will need to use the WorldBorder plugin to establish "up until where" you want the world explored.
The way this works is fairly simple: You will setup a local Minecraft server with Dynmap & WorldBorder plugins, give yourself OP, run few commands and wait for the server & plugins to prepare the map for you. Let's start with the setup.
Step 1: Java & BuildTools
Hopefully, you should have Java runtime already installed, as you have been playing Minecraft for a while now. If not, fix that by going to java.com/download. Download & install.
Now you need to build your spigot server software java executable. It may sound complicated, but it really isn't. Head to spigotmc.org and download BuildTools.jar.
Once you have that, open commandline or terminal in the same folder where BuildTools.jar file is. You can do this by holding shift and rightclicking in the directory and selecting Open Commandline/Powershell/terminal here.
Once the commandline or terminal window is open, type java -jar BuildTools.jar --rev latest and hit enter. This will use the BuildTools.jar to download and build spigot server software. If you know what you are doing and need a different version, you can specify version of spigot to be built after the --rev parameter.
Once the script finishes, new spigot-[version-number].jar will be created in the same directory. Create new directory called server and copy the file there.
Side note: When I was doing this for the first time, I was really confused about why do I need to ge BuildTools to build spigot locally, instead of just downloading the spigot executable. It seems that there was a legal disagreement between old and current developers on the direction of spigot, and due to some license issues the new developers cannot provide a direct executable link. This is their workaround for that.
Step 2: Get and Setup Plugins
Download Dynmap plugin.
If you also want to auto-explore the map, download WorldBorder plugin as well.
Both of these are .jar files. When determining what version of the plugins to download, use the version that matches the [version-number] in spigot-[version-number].jar you have copied into the server folder earlier.
Create a plugins folder inside the folder server that you have created in Step 1.
Copy both .jar files into the server/plugins directory.
Step 3: Copy your world files into the server directory
Open the directory that contains your world files (you should see level.dat file there). Select everything and copy it.
In folder server create new folder world. Open it and paste the world files in there.
Step 4: Launch the server
Open terminal in the server folder and run this command:
java -jar spigot[yourversionhere].jar --nogui
If this is the first time you are doing this, it will exit immediatelly and produce an eula.txt file.
Open the eula.txt file, find the eula=false line, change it to eula=true and run the command again. Server should now start. Congratulations, you've just accepted the license agreement and the server is starting.
Feel free to make yourself an OP on the server by running op YourNameHere in the server console. Keep the server console running (you can minimize it though).
Step 5.0 - Use Case: Just Generate the Map
The Dynmap plugin will provide you with the server map through the web browser. You can try it when the server runs by opening your favorite browser and going to http://localhost:8123. Chances are you will see just black screen - the dynmap haven't rendered the map yet.
Luckily, we can tell the plugin to render the whole world by dynmap fullrender command via server console. Before you do that, consider whether you want to exclude some worlds from being generated - for example, you may not need to render maps for world_the_end and world_nether. If that's the case, before you run the fullrender command, exclude these worlds with dmap worldset world_the_end enabled:false and dmap worldset world_nether enabled:false respectively.
The Dynmap plugin will report its progress on rendering regularly in the server console. You can check the address mentioned above to see how much of the world is already available.
Step 5.1 - Use case: Explore the world, then generate map
If you have just started the map, or you want to generate the map that will have a rectangle/eliptic/other shape and everything within the shape is going to be available (explored), you need to utilize WorldBorder plugin.
I recommend to set this up from the game - so make sure you are an OP on your server and log into the game (address is by default localhost).
Use /wb set NUMBER, where you replace NUMBER with number of blocks from your position at which you want to set the world border. This is step is important, because the world border set is determines how far the map will be autoexplored by the plugin.
To alter the worldborder type, explore /wb help and look for options in /wb shape. You can set the world border to be rectangular or eliptic and define its properties.
To start the auto-exploration of your world you need to run two commands. You must run the second command within 10 seconds from when you have run the first one. If you don't make it on time, you have to run both of them again. Run:
-
/wb fill -
/wb fill confirm
Once you have run these commands, the plugin starts exploring the world and report its progress in server console. And your chat if you have run this from the game.
When the exploration is finished, do the same as in Step 5.0.
Troubleshooting FAQ
I can not see anything in browser. What is going on?
If you see the map UI, but don't see the map, it has not rendered yet. Run the fullrender commands and wait for it.
If you don't see the UI, but an error page, one of the possibilities is that the plugin could not expose the map on port 8123 - because it is being used by different service. Try editing plugins/dynmap/configuration.txt and updating webserver-port: 8123 to some other number. Make sure the number is over 1024 (0-1024 are usually reserved) and roughly under 65k. You will then want to access localhost:YOURNUMBER.
TBD once you reach out with other issues.
Source: https://www.danieldusek.com/create-an-interactive-map-of-your-minecraft-world.html
0 Response to "How to Make Continuous Maps Minecraft"
Publicar un comentario